Attach Outlook Email to Planner Tasks via Power Automate

You often find yourself in the situation where you would like to turn an email into a Planner task. You could set up Power Automate (previously Microsoft Flow) to copy the email contents to a task, but finding the email again can be a real hassle. So how about adding a link to the email to the task, so it’s just one click away?
Turning an email into a task
First, we need to somehow trigger a flow to turn an email into a task. Flagging an email seems like the most intuitive way to do that:

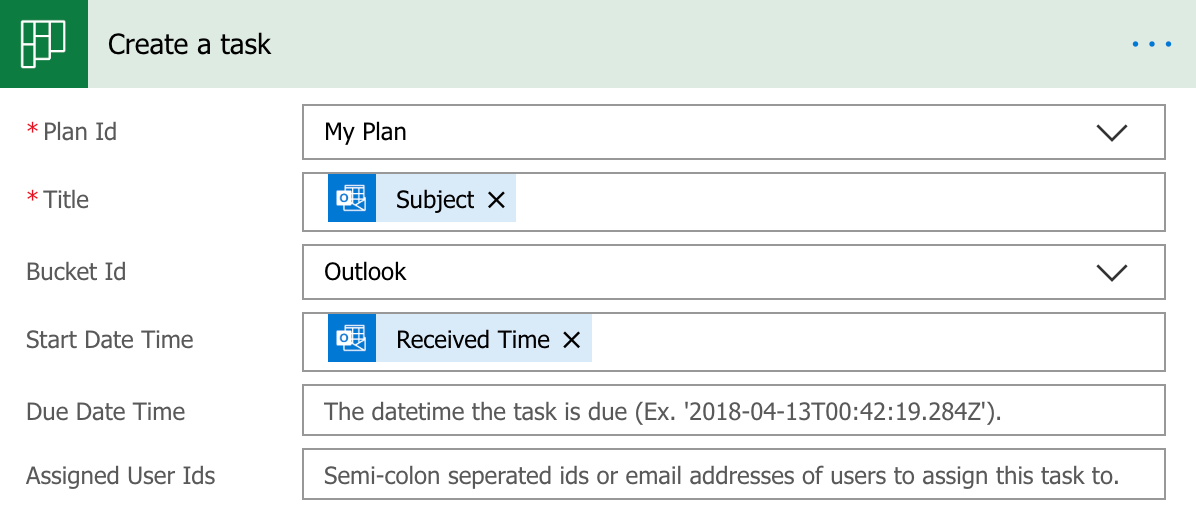
Next, let’s set it to create a simple task in Planner. I like to use the subject line as the task name and the email date as the start date for the task.

You can use any Bucket ID you like, though I named mine “Outlook” for convenience
We can now go on to adding more information to the task we just created.
Generating a URL to the email
The easiest way to attach an email is by linking to it. A lot of the solutions you find about this topic on the internet are unanswered, outdated or only work on Windows. It seems like there’s no easy, cross-platform way to open a specific email.
However, we can take a look at how Outlook itself does it. When right-clicking an email on the web interface, you can turn it into a task on the similar-yet-different Microsoft To Do. There, too, the email is attached as a link. Let’s examine the URL:
https://outlook.office365.com/owa/?ItemID=AAMkADI5MWYyOGYxLWU4ZDktNGRiMi1hM2Q3LThkMmY1YTExYTA3MwBGAABBAABDjg1lUeiqSa2RUzf5HDbJBwAgHf7q8agSRaU3Ls5SniBmAAAAAAEMAAAgHf7q8agSRaU3Ls5SniBmAAGxBEmWAAA%3D&exvsurl=1&viewmodel=ReadMessageItem
That ItemID parameter looks like something we can work with! Playing around with the various email IDs Power Automate makes available, we can see that it corresponds to this email’s Message Id field:
AAMkADI5MWYyOGYxLWU4ZDktNGRiMi1hM2Q3LThkMmY1YTExYTA3MwBGAABBAABDjg1lUeiqSa2RUzf5HDbJBwAgHf7q8agSRaU3Ls5SniBmAAAAAAEMAAAgHf7q8agSRaU3Ls5SniBmAAGxBEmWAAA=
But you’ll quickly notice they’re not quite identical. The = symbol has been URI-encoded. Luckily, Power Automate provides a function for this. Let’s apply that to the ID we got from our trigger output:
uriComponent(triggerOutputs()?['body/Id'])

Result: 'AAMkADI5MWYyOGYxLWU4ZDktNGRiMi1hM2Q3LThkMmY1YTExYTA3MwBGAABBAABDjg1lUeiqSa2RUzf5HDbJBwAgHf7q8agSRaU3Ls5SniBmAAAAAAEMAAAgHf7q8agSRaU3Ls5SniBmAAGxBEmWAAA%3D'
Perfect! That’s exactly the same as on the Microsoft To Do task.
Bringing it together
Let’s implement that in the flow by adding a new step to update the task details.
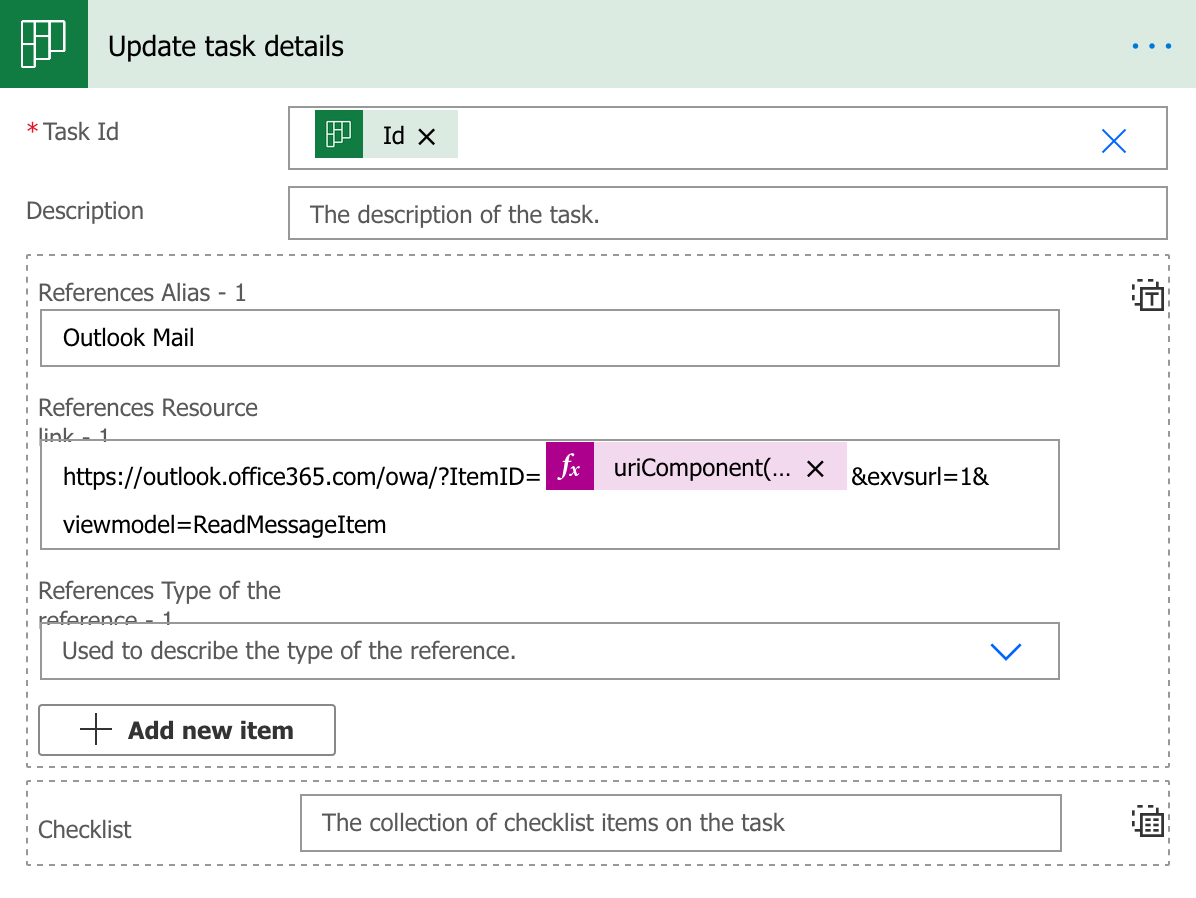
Choose any text you want to display as the link text and put it in the Alias field. Next, add the resource link (URL) by inserting the expression we created into the URL template we got from Microsoft To Do. Here are the three elements:
https://outlook.office365.com/owa/?ItemID=

uriComponent(triggerOutputs()?['body/Id'])

&exvsurl=1&viewmodel=ReadMessageItem

The node should look like this when all filled out.
Make sure to insert the middle line as an expression via “Add dynamic content”. In my testing, leaving out the URL parameters after the ID didn’t have any effect, but we can add it just to make sure.
There you go! Flag any email in your Outlook inbox and soon enough, it should appear on Planner with a link to the email.

Neat.
You can of course expand on this by adding the body of the email to the task text, automatically assigning people to the task and other interesting things. Have fun!
Note: This post was updated on the 4th of December 2020 to introduce the link format used by Microsoft To Do.
Previous updates included changes to the URI encoding process on the 16th of November 2020.